Paper crafting is works of heart

Paper crafting is works of heart!

Sunday, December 30, 2012

employee of the month special creation

Oversized easel-type card for Employee of the Month Congrats

School District starts EOM recognition and 1st recipient is Middle School Secretary

My teaching position is a split of duties between middle school (7th-8th graders) and high school home economics classes. So when the middle school secretary was honored, I wanted to create a very special card for this very special lady. She's our angel!

The card has a whole range of techniques, supplies, and vendors! There's tracing, stenciling, embossing, inking, embellishing, sanding, cutting, etc. The angel image is a re-purposed image from a thank you note card. Some of the vendors include Paper Wishes (yellow heart brad), Martha Stewart Crafts (congrats ribbon), Elmer's Craft Glues (adhesives), etc.


Saturday, October 6, 2012

Feminine birthday card

First week of October 2012= birthday card for one of my bosses

stamping, doily, brad, ribbons used like streamers, collage/scrapbooking styling

From the get-go planning the card's look, I wanted to do an oversize, stand-easel type of card for my boss to be able to display on her desk.

The photos include three that focus on the 3 corners that had the bulk of layers and details. The 4th corner was deliberately left open in order to let it 'breathe'--not get overloaded.


Sunday, August 26, 2012

Beccas Heart for HEarts: Sharing human feature article written for past iss...

Beccas Heart for HEarts: Sharing human feature article written for past iss...: Mrs. Godden, a former Home Economics teacher Article #9                      by Rebecca Sadler                    9/21/2010 CHS Comm...

Beccas Heart for HEarts: Sharing another human interest story written for p...

Beccas Heart for HEarts: Sharing another human interest story written for p...: Chuck Porter, trainer, with Malabar's Dream Girl Chuck Porter profile              by Rebecca Sadler                August 23, 2010 ...

Friday, August 17, 2012

Sneak Peek classroom decor

I have more classroom decorations up than what I photographed, so I will give you a sneak peek of some items from 2 days ago:


Cheerful! (or at least the teenagers will think so).....

Wednesday, August 15, 2012

Quick birthday card post

Teacher Institute days start tomorrow and I've still lots more to do in my classrooms (I've got 3!) before greeting students on Monday. So this post is super short.

Here's the cover photo and inside completion photo for a birthday card made last week for an aunt:


Some of the supplies/vendors include:
1. Studio G= beige embossed card; hummingbird stamp, wish stamp; 2 patterned papers; brad
2. Martha Stewart Crafts= congratulations ribbon
3. EK Success= pastel glitter dots
4. Tsukineko Inc= Enchanted Evening Encore! Metallic Ink pad

Friday, July 27, 2012

Sneak peek of 2 more autumn cards

Thanksgiving Cards:

These cards couldn't be more diverse!

Modern contemporary vs traditional=
Unusual focal piece vs unusual fold/edge lines=
Unusual colors vs traditional autumn color palette=

Both cardstocks are from Colorbok. Queen Anne's Lace brad and decorative tape, "thank you" stamp, leaf stamp, "so thankful for you" stamp are from Studio G. Leaf stickers were purchased through Current Catalog. The text image of the definition of 'thankful' comes from 1,000 Card Quotes by Hot Off The Press purchased through Paper Wishes. Text box located behind the brad on the autumn contemporary card was done on home computer using Bradley Hand ITC font at 16 point size.

Here's the contemporary Thanksgiving card:


Here's the more traditional looking autumn color palette Thanksgiving card:


Beccas Heart for HEarts: Accents: home or school decor

Beccas Heart for HEarts: Accents: home or school decor: Using a set of 3 prints in 3 different ways Prints ideal for a farm theme or early childhood classroom or children's nursery: I had a cr...

Crafting for school decor

Classroom decorations and signage

Last school year vs this coming school year:

My one room, middle school home ec classroom, last year served both high schoolers and middle schoolers. Each level is considered distinct and separate but the buildings are connected with a series of hallways that wrap-around the middle school gym (which is the newer one and the larger of the two) as well as the cafeteria. There are several 'shared' teachers. Also the high schoolers are allowed to come down to the ms end for classes but not vice versa.

The big change for the coming year is the full-time hs home ec teacher resigned and my position has sort of merged with hers. So I will have 2 rooms at the far end of the high school where I will be for the 4 morning class periods. Then I will have a lunch break and a plan period. I can either stay there, go to one of the teachers lounges, or transition to the middle school home ec classroom.

This means 6 classes out of 7 periods! This means 3 rooms of inventory and 3 rooms to decorate!

Our mascot is very special--the only one in the world--Cornjerkers! So I've done some word processing using the phrase "A-maize-ing" along with clipart of corn. Last year I had a small collection on display of fall decorations that involved Indian corn, acorns, and ears of corn. I'm planning on adding to that. I also used candy corn clip art images to designate kitchen lab unit areas (one candy corn image for kitchen lab #1 up to 4 candy corn images for lab #4). Here's some of the new items I have gotten started with:


The blue owl print and green owl print fabrics along with the colorful circles fabric have had squares cut and then wrapped around the small cork tiles. I've included a plain cork tile to show that.

In the background in the plastic sheet protector pages, I've created backgrounds to showcase newsy items that I find when looking at magazines, newspapers, and websites that I want to share with the students.

The clip art and word art are waiting for me to cut apart and use for labeling (might be used to showcase homework assignments, bell ringer activities, reminders of what to bring to class, etc.).

The Cornjerker mascot looks like a giant ear of corn (humanized with eyes, arms, legs,...). So it's mostly green and yellow. However the school colors for sports uniforms, lettering, signage, and so on are royal blue, white, and red as accent color. The school district has had smaller rural schools that have merged over the years which might explain the color choices.

So I've decided that for this year I will decorate many of the zones in the ms home ec room with shades of blue and the hs home ec rooms are going to have lots of greens, especially spring green/yellow-green shade like in the fabrics.

Teacher Institute Days start on August 16th, so summer vacation is almost over!! I'm excited about the fun prints and ways to use corn, candy corn, Indian corn, acorns, and maize throughout the rooms.

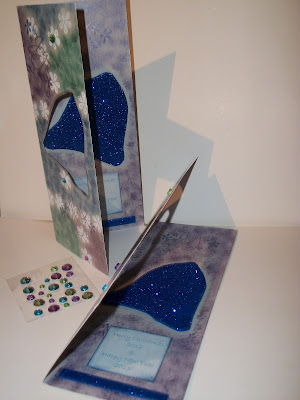
Surprise: another New Year bell card style

2012-2013 winter holiday cards

Sneak peek at inspirations for trying another bell-theme card:

Tiny Crafts' has a glitter foam sheets with adhesive backing that I discovered out shopping yesterday. They have a pastel color combo set and a bold color combo available. The bold blue glitter foam sheets were used as the theme and color inspiration for this other bell style holiday card.

To get inspiration for the layouts I merged 2 ideas from a purchased book on different techniques to use for card-making (see photos).

Here's the series of photos:


layout inspiration for bell shape opening

layout inspiration for crazy quilt effect

book cover photo: both layout pages are from this book
bell shape traced and cut out for each card's front and slightly enlarging bell shape so that the glittered foam ones on inside will not fall inside the opening when the cards are closed

views of insides completed

close-ups of inside (left) and bottom front cover (right)

completed cards!!

Edit update for sneak peek New Year cards

2012-2013 Season Greetings

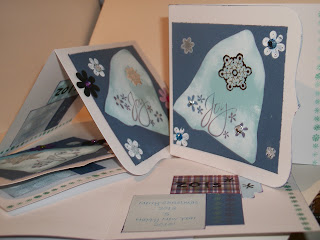
Update on the bell-joy New Year theme cards:

See some added embellishments and how I completed the inside views for the "joy" cards.

cards' photo posted about 2 days ago


additions include: border stamping, gems, felt florette gems, and a text block for the inside

Some of the supplies and/or vendors include:
a. felt florette gems - purchased at Hobby Lobby
b. Encore Ultimate Metallic's Enchanted Evening ink pad - Tsukineko, Inc.
c. icy snowflake metallic/vellum stickers- EK Success
d. text block font "bradley hand ITC" in 16 point


Wednesday, July 25, 2012

Fall/Thanksgiving 2012 cards Sneak Peek

Showing appreciation

Exciting to get a jump start on fall season cards:

Another sneak peek! This time is to showcase several styles and variations on harvest-theme giving thanks cards. 4 of these are planned to give to school board members, so they will get the apple and sunflower styles. I've got a few more to do for that particular group and I've got 2 ready for giving to relatives or close friends! I'm so excited to have had the time to get started on these.

With the super hot 100+ degree heat, I'm not able to be too active, so working in my craft zone in the basement allows me to be productive in a small way.

Below will be some group shots and some close-ups:


some of the supplies and their vendors include:
Studio G = "so thankful", "thank you" stamps, ribbons
EK Success = pastel glitter dots
Current Catalog = fall leaves stickers
apple 'block' panel image and leaf 'block' panel image are from a bulletin board border
sisal twine
staples

Christmas 2012/Happy New Year 2013 Sneak Peek

Happy New Year cards

Just getting started!

With teaching and church activities always being hectic just before Christmas, what has happened in the past few years is I don't get most of my cards out until between Christmas and New Year's. Sadly for us, both my husband and I have had close relatives that have been severely ill and/or died at this time of year for quite a few years recently. Doesn't matter if I use boxed cards or create my own I'm always getting some mailed after Christmas.

In the past 3-4 years that I have been intent on creating cards, I have never started this early making holiday cards, so this is creatively exciting for me to have gotten started in the past 2-3 days. I'm hoping to keep up the mojo for another week or so until teaching starts!

Here's the first style I've attempted:

icy snowflake vellum/metallic stickers= EK Success
"Joy" stamp and flower/snowflake stamp= Studio G
Enchanted Evening Ultimate Metallic Encore ink pad= Tsukineko, Inc.
blue gray cardstock= Colorbok

Anniversary card

Layers of details

Anniversary card for my brother and sister-in-law

I'm excited to hear from my sister-in-law April to get her reaction to this card. 18 years!! I've added some number symbolism through some of the details (small punched hearts, stamped hearts, brad hearts). There is a total of 5 family members for them/3 children. The kids are 13, 10+, and 6+.

The layers include doilies, stamping, cardstock/papers, felt, brads, glitter dot embellishments, etc. Some of the specific supplies and vendors are: 3 different heart stamps and rickrack border stamp= Martha Stewart Crafts, ink-Enchanted Evening Ultimate Metallic Encore ink pad= Tsukineko, Inc., pastel glitter dots= EK Success, Adhesive Mat Stack and The Once Upon a Time Mat Stack cardstock= DCWV, 3 heart brads and colored print tab (shown on inside view)= Hot Off The Press through Paper Wishes.com, small heart punch, "Joy" stamp, and "Love" stamp= Studio G.


front/cover
close-up of the top portion of card's front

close-up of the bottom portion of card's front


inside view

Friday, July 20, 2012

Card-making: using a new gadget

New gadget bought on clearance!

traditional "greeting" card

First of all about the new gadget: a few weeks ago while in JoAnn Fabrics I checked a clearance section trying to focus on paper crafting items. And behold, Fiskars tab punch was on clearance for $1.97!!! Yes! For that price I couldn't pass it up. I've used some tabs in the past that have come as embellishments within a kit or pack but rarely die-cutting or creating my own.

 So the recipients of the card are friends I haven't seen or heard from in awhile and I thought a simple "hello" kind of thinking-of-you card would be perfect to add some tabs.

I inked edges of my papers to add definition. I stamped ink onto 1 tab to distinguish it from the other. I made the top flower shape smaller and with different petal shapes to add distinction between the layers. Here's the greeting card:

 front of card (above); scanning on the printer faded out the lavendar in certain areas--sorry.

inside completion of card; very simple= stamped a round purple ink pad onto the cardstock and then stamped the white inked "hello" scalloped circle on top; then I lightly traced over the letters in pencil so they would be readable.

supplies/vendors:
1. The New King James New Testament (paperback)= Broadman & Holman Publishers
2. "hello" scalloped circle stamp, white ink pad, brad= Studio G
3. tab punch= Fiskars
4. lavendar card stock= Colorbok

Wednesday, July 18, 2012

Making a card using coordinated papers

Using coordinated patterned papers to make a birthday card

Female recipient

Posy flower and simple leaves

Last week was a crazy one full of family obligations, travel, battling the heat, and struggling with health issues enflamed by the heat. Squeezing in time to create cards was very difficult. I did a few quick and easy ones by embellishing pre-printed notecards. But by using a set of coordinated papers, I was amazed how quickly I put together this birthday card for an aunt:

front cover of card


inside completion of card

Some of the supplies/vendors:
1. The Ava Collection 2011 by Purple Paislee= all patterned papers
2. Studio G= gray ink pad, "make a wish" stamp
3. Martha Stewart Crafts= "best wishes" and "happy birthday" ribbons
4. Elmer Craft Bond adhesives/glues
 I had already had the 5 x 7 inches golden orange cardstock folded and the other patterned "mat" of cardstock came sized 4 x 6 so it just needed to be adhered. I just free-formed cut the leaves. I also keep a variety of stencil shapes handy so the 2 flowers and 1 rectangle were easy to get traced, cut, inked, and adhered. Easy-peasy!!!! A very summery sun-shining tropical retro looking birthday card!

Wednesday, July 11, 2012

Texture panel embossed for card

Teen girl birthday card

Embossed card stock panel for glitter cake embellishment focal

It's hard to believe that my brother's oldest child is now 13! She loves purple and pink like her Aunt Bec-Bec (me). YEA! I haven't done much embossing in my card making in the past 2 years and thought I would resurrect that technique for this very special gal.

Here's my result:

cover of birthday card


inside of birthday card for teen


close-up of inside pocket

Behind the ribbon bundle inserted into the pocket is her birthday money--$13 for being 13 years old--a tradition my husband and I started for my nieces and nephews about 6 years or so ago.

Supplies & vendors:
1. Martha Stewart Crafts = happy birthday ribbon
2. Studio G = make a wish stamp, 6 petal flower stamp, white ink pad, gray ink pad, brads
3. Offray= mini lavender ribbon
4. Colorbok = deep purple and hot pink cardstocks
and others

2nd installment of embellished pre-prints

Embellished pre-printed note cards

Another design...a different approach...masculine receiver

I tried to keep it simple...I know...that's extremely hard for me to do. But I really really tried this time!!! I used some sisal twine to give some roughness but I used the glittered dots to add some shine and texture against the dark chocolate brown background of the pre-printed design. Inside I used a leaf shape to continue the flower/weed images from the front. And I've repeated colors of beige, gold, and blue to help make color consistencies.

What do you think?


cover of notecard


inside completion of notecard

Some of the vendors for supplies include:
1. Studio G for all stamp images
2. Gold color cutter pen
3. Elmer's Glue Craft adhesives